
Creating a new tariff #
Login to the site #
- Go to the front of the site: Go to https://yourwebsite.com/ and enter your employee name and password.
- Go to “Settings” ->> “Rates”. On the top left, click New.
Creating a tariff #
- Enter the following data to create a new tariff:
- Tariff – the name of the tariff to display in the list of rooms and tariffs when booking. It’s convenient to use for promotions and creating additional rates.
- What is included in the price – text information about what services are included in the price of this tariff, you can also add additional services, noting that they require additional payment.
- Room type – this tariff refers to a certain type of rooms, all rooms of the selected type found in the system will be available for sale with this tariff.
- Max. nights – the maximum allowed length of stay at a given tariff. Convenient for special rates, promotions, etc.
- Min. number of persons. – The minimum total number of people allowed to book at this rate. It is convenient if you want to prohibit single occupancy, or double occupancy. For example, putting a number 2, you will prohibit accommodation for one person. By putting a number 3, you will prohibit accommodation at this tariff less than 3 people.
- Max. number of people. – Maximum total number of people allowed to book on this fare. It is convenient at promo rates. Say if you set number 1, you prohibit accommodation at the given tariff more than 1 person. If you set the number 3, you prohibit accommodation at this rate more than 3 people.
- Show Guest Types – set YES to open a special block with a list of guest types, where you can specify the minimum and maximum number of people for each guest type allowed for the reservation at this rate. Leave it set to NO if the capacity settings for each guest type set in the room type settings selected for this fare (made earlier inside the room type settings) suits you.
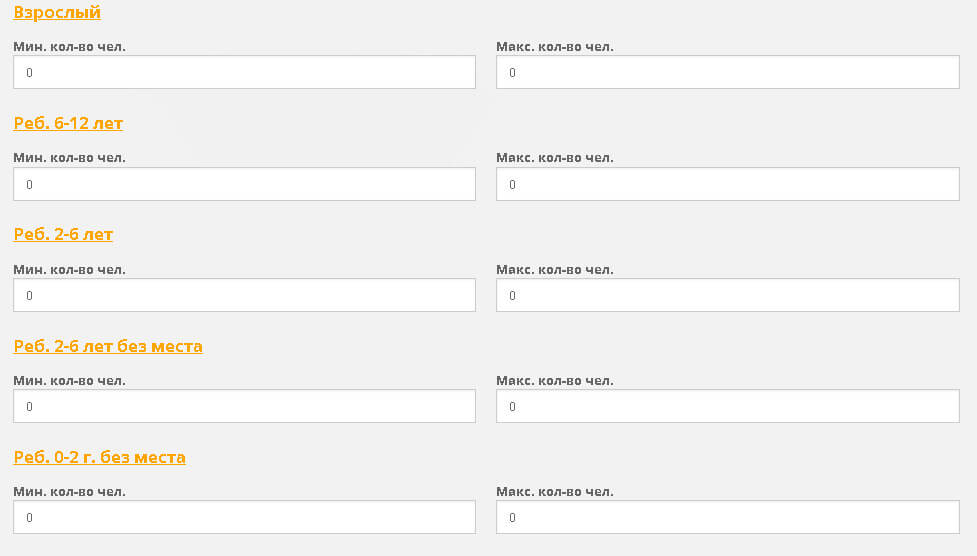
Показать типы гостей
- Is the tariff available to partners? – determine the availability of this fare for different groups of clients. If set to NO, customers whose status is affiliate (usually tour operators or agents) will not see this fare in the general list. When set to YES, the fare will be available for any type of customer. If set to PARTNER ONLY, the fare will be available for booking only for customers who have partner status (tour operator or agent), and customers without such status will not see this fare in the general list.
Nutrition #
- All On – When set to YES, the power type for this tariff will be displayed as “All On”.
- Breakfast – if set to YES, the meal type at this rate will contain breakfast.
- Lunch – When set to YES, the meal type at this rate will contain the availability of lunch.
- Dinner – if set to YES, the meal type at this rate will contain the availability of dinner.
Prepayment #
- Type of prepayment – set to “No prepayment” or “Hybrid”. If set to “Without prepayment”, when you select this tariff, the prepayment amount will be zero. If set to “Hybrid”, the prepayment amount for this fare will be set according to the formula specified in the following “Prepayment” parameter.
- Prepayment – The formula for calculating prepayment 60-365:10:20-30,30-60:5:20,1-30:3:20 is deciphered as follows:
- the formula is based on the number of days from the reservation date at that rate to the check-in date. 60-365:10:20-30 is the first period of the three in the example, separated by commas without spaces. This first period means that if the number of days from the reservation date to the arrival date is between 60 and 365 days – the client will have 10 days from the reservation date to make the prepayment (the number 10 is specified immediately after the period with a colon without spaces, like this: 60-365:10). Then specify the amount of prepayment separated by a colon, or two amounts of prepayment separated by a hyphen (if the prepayment is made in two payments), like this: 60-365:10:20 or 60-365:10:20-30. In the first case (60-365:10:20), the prepayment amount would be set at 20% and paid in a lump sum. In the second option (60-365:10:20-30) the prepayment is set at 20%+30%=50% and is payable in two installments, the first 20%, the second 30%. The first installment must be paid within 10 days of booking, as specified in the formula. The second installment must be paid no later than 14 days before the date of arrival (the number 14 is fixed and cannot be changed). The following period is based on the same principle. 30-60:5:20 is the second period of the three in the example, separated by commas without spaces. This second period means that if there are 30 to 60 days from the reservation date to the check-in date – the client will have 5 days to make the prepayment (the number 5 is indicated immediately after the period with a colon without spaces like this: 30-60:5), and the prepayment will be set at 20% (indicated with a colon like this: 30-60:5:20) and will be paid in a lump sum. The last period in the example 1-30:3:20 means that if the client has 1 to 30 days from the reservation date to the date of check-in – he will have 3 days from the reservation date to make the prepayment (the number 3 is specified right after the period with a colon and no spaces like this: 1-30:3) and the prepayment will be 20% (specified with a colon like this: 1-30:3:20) and will be paid in one time.
- You can enter as many periods as you like, separated by commas without spaces. You can enter one period like this: 1-365:3:20 – that would mean that when booking from 1 to 365 days before the date of arrival, the client would have 3 days to make a prepayment of 20%. Or for example two periods: 1-60:5:30,60-365:10:20 – it would mean that when booking from 1 to 60 days before the date of arrival the client will have 5 days to pay the deposit of 30% and when booking from 60 to 365 days before the date of arrival the client will have 10 days to pay the deposit of 20%. We recommend covering up to 365 days in your periods.
- Min. days before check-in – the minimum number of days before the check-in date, after which the fare will be hidden. Useful for early booking promotions, when you want to hide the fare when a certain number of days before check-in date is reached. Say if you specify 50 in this field, then if there will be 49 days before check-in date, the rate will not be displayed. This is done to encourage advance purchases by creating an additional discounted fare.
Work with a table of prices and the minimum number of days of accommodation for each date for 2 years in advance #

Working with the table of prices and the minimum number of days of stay
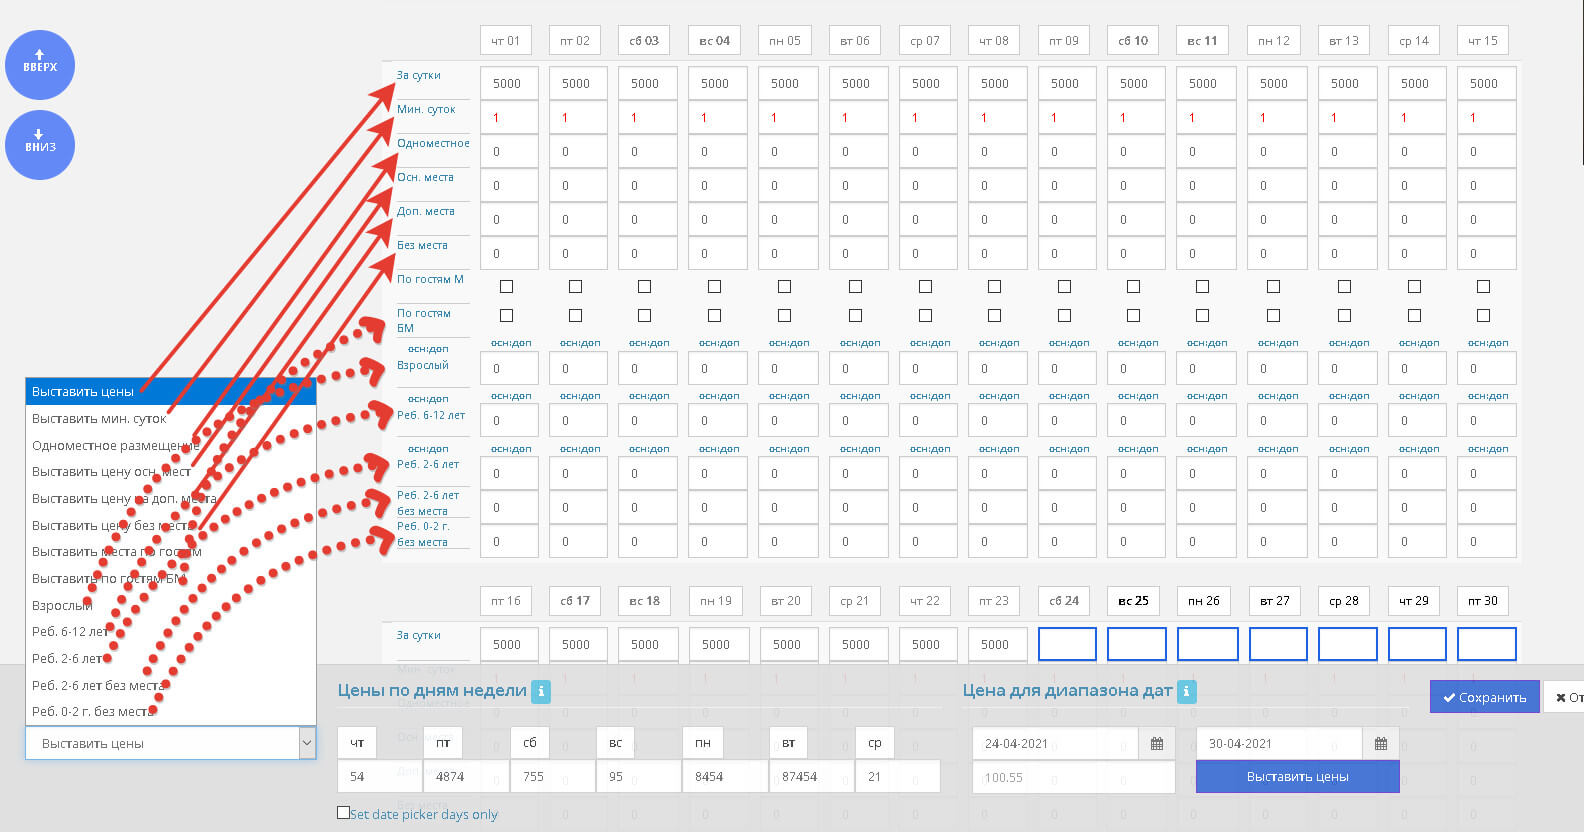
- Set prices and the minimum number of days you can stay below. After all fields, scroll the screen below the caption “Set prices/min. number of days”. You will see a special table with dates, where you can enter the detailed tariffication of each day for the selected room type. The table consists of 24 blocks by months (2 years ahead), each block is divided into 2 blocks of 15-16 days from left to right. Each column contains parameters for the specific date. When calculating the tariff, all dates between arrival and departure date will be summed up, even if the data in them are different. It is this feature that makes the system very versatile and flexible.
- At the very bottom of the screen, from left to right, there are fields for mass data entry into the price table, by selecting a specific row from the list and entering specific data for the selected date range into the selected row.
Mass filling of the table #
Mass filling of the table
- Selected row – under this inscription (at the very bottom of the screen) there is a list of table rows in the following correspondence (if you select one of the items in this list you can set the corresponding prices in bulk – the transcription below):
- Set Rates = Per Night
- Set Min. nights = Min. nights
- Single Room = Single Room ( or one person in any room )
- Set Price of Basic Seats = Basic Seats
- Price for Extra Seats = Extra Seats
- Set Price Without Seat = No Seat
- Set Seats by Guests = By Guests WP
- Set Seats by BM Guests = By BM Guests
- This is followed by a list of guest types, for example:
- Adult = Adult
- Child 6-12 years old = Child. 6-12 year olds
- Child. 2-6 years old without a seat = Child. 2-6 years old without a seat
- and so on…
- From top left to bottom in order, the fields have the following values:
- Per day – the cost of accommodation, which is not included in the calculations, only displayed for promotional purposes in the booking process at the second stage. You can specify any cost. When displayed on the page, the amount will look like this: “from xxxx rubles”.
- Min. days – the minimum number of days to stay on this date. When selecting the check-in date, the client will not be able to select this tariff if the number of days of stay will be less than the number of days specified in this field. If you set the value of this field to zero, then this tariff will become unavailable at all on this date (will be hidden completely).
- Single – the cost of the rate for single occupancy.
- Next to the checkboxes “By guests WP” and “By guests NP” are the fields of simplified billing, when people are counted only on the main and additional seats and people “without seats” without taking into account their age and type. For simplified billing, the fields used in the calculations are: “Single”, “Basic Seats”, “Extra Seats”, “No Seat”. If both checkboxes are checked, the extended tariffication starts to work and the following fields are used in calculations: “Single” and all fields below the checkboxes (other fields above the checkboxes are not used) that correspond to guest types. Guest types are divided into those with seats and those without seats. For those with seats, the price is specified in the following format: “price for this type of guest in the main seat : price for this type of guest in an extra seat”. For example: 1230:900 – prices are entered in a single space with a colon. Only a decimal point can be used to indicate decimal fractions of a number (a comma will not work and will create an error in the rate). For guest types “without seat” price is indicated as a single number.
- Basic seats – this field is used for simplified billing scheme (you decide which of them to use and for each date you can use different billing, switching of billing type is in the checkboxes “By WP guests” and “By NP guests”. If “By WP guests” checkbox is NOT checked, simplified tariffication for guests with main and extra seats is used. If “By NP Guests” is NOT checked, simplified pricing for guests “without seats” is used) and implies the cost per guest in the main seat without taking into account their age and type.
- Additional seats – this field is used for simplified billing scheme (you decide which of them to use and for each date you can use different billing, switching of billing type is in the checkboxes “By WP guests” and “By NP guests”. If “By WP guests” checkbox is NOT checked, simplified tariffication for guests with main and extra seats is used. If “By NP Guests” is NOT checked, simplified pricing for guests “without seats” is used) and implies the cost per guest per extra seat without regard to age and type.
- No seat – this field is used for simplified billing scheme (you decide which one to use and for each date you can use different billing, switching billing type is in the checkboxes “By WP guests” and “By NP guests”. If “By WP guests” checkbox is NOT checked, simplified tariffication for guests with main and extra seats is used. If “By NP Guests” is NOT checked, simplified tariffication for guests “without seats” is used) and it means the cost of one guest “without seat” without taking into account their age and type.
- By WP guests – after ticking this checkbox for a specific date, the advanced guest “with seats” tariffication applies and the following fields start to be used for tariff calculations: “Single” and all fields below the checkboxes (other fields above the checkboxes are not used) that correspond to guest types. Guest types are divided into those with seats and those “without seats”. For those with seats, the price is specified in the following format: “price for this type of guest in the main seat : price for this type of guest in an extra seat”. For example: 1230:900 – prices are indicated together without spaces, separated by a colon (above the prices there are hints in the form: “main:extra”). To specify the decimal fraction of the number you can only use a point (comma will not work and will create an error in the tariff). For “no seat” guest types, the price is specified as a single number, without the colon.
Mass checkboxes “By guests WP” and “By guests NP” #
To mass checkboxes “By WP Guests” and “By NP Guests” use number 1 in the price field and number 0 in the price field to mass uncheck them. In other words, by setting the price to 1 for a row of checkboxes you mass check them, and by setting the price to 0 for a row of checkboxes you mass uncheck them. By clicking the “Set prices” button.
- For NP guests – after checking this box for a particular date, the extended “no seating” guest rate applies.
- Price for date range – under this inscription (at the very bottom of the screen), are:
- The start date of the price setting range (left),
- The end date of the price setting range (right).
- Under the dates (on the left) there is a field for setting the price (enter there the price you want to set for the selected date range for the selected row).
- Under the dates (on the right) there is also a button to set the price “Set price”.
Continue to change prices en masse by selecting different rows from the list on the left (bottom of the screen), selecting the desired date ranges on the right (bottom of the screen), entering the price (next to the dates at the bottom of the screen) and clicking the “Set prices” button. This way you will reduce the time it takes to enter prices into the many fields. When you have finished entering prices in all of the required rows and dates, click the “Save” button.