
Our plugin is compatible with these plugins out of the box: #
- WooCommerce (All order emails)
- WooCommerce PDF Invoices & Packing Slips (from Wp Overnight) (Emails + Files)
- Kadence WooCommerce Email Designer (Emails)
- YITH Point of Sale for WooCommerce (Receipts)
- Advanced Custom Fields ( ACF – fields from products of Woocommerce )
- Print Invoice & Delivery Notes for WooCommerce By Tyche Softwares
- WooCommerce PDF Invoices, Packing Slips, Delivery Notes and Shipping Labels plugins By WebToffee ( Need to enable footer in all document types of WebToffee )
- Woocommerce Product Vendors ( blocked qr code for vendor emails )
Settings Page in Admin #
Go to WordPress admin -> Settings -> QR Code Tag (from Goaskle.com)
Colors #
You can change the color of the graphical information that the QR code is filled with by using the Main Color parameter in the plugin settings.
You can change the color of the margin around the QR code with the help of the Margin Color parameter in the plugin settings.
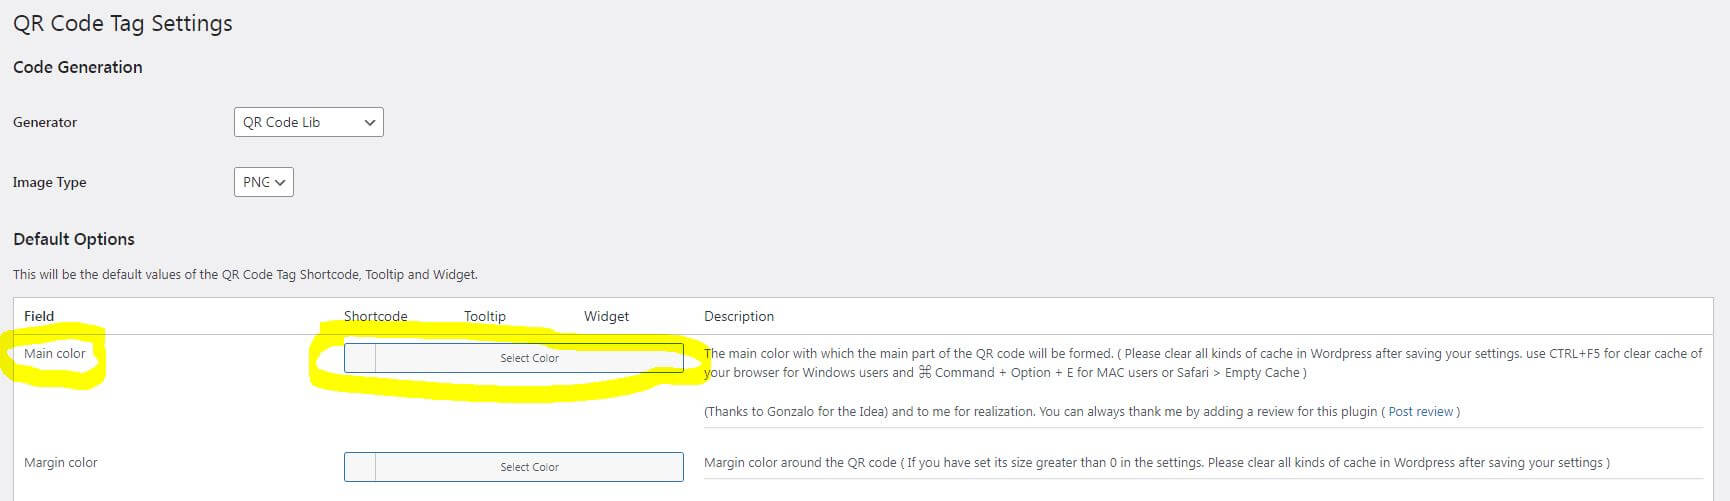
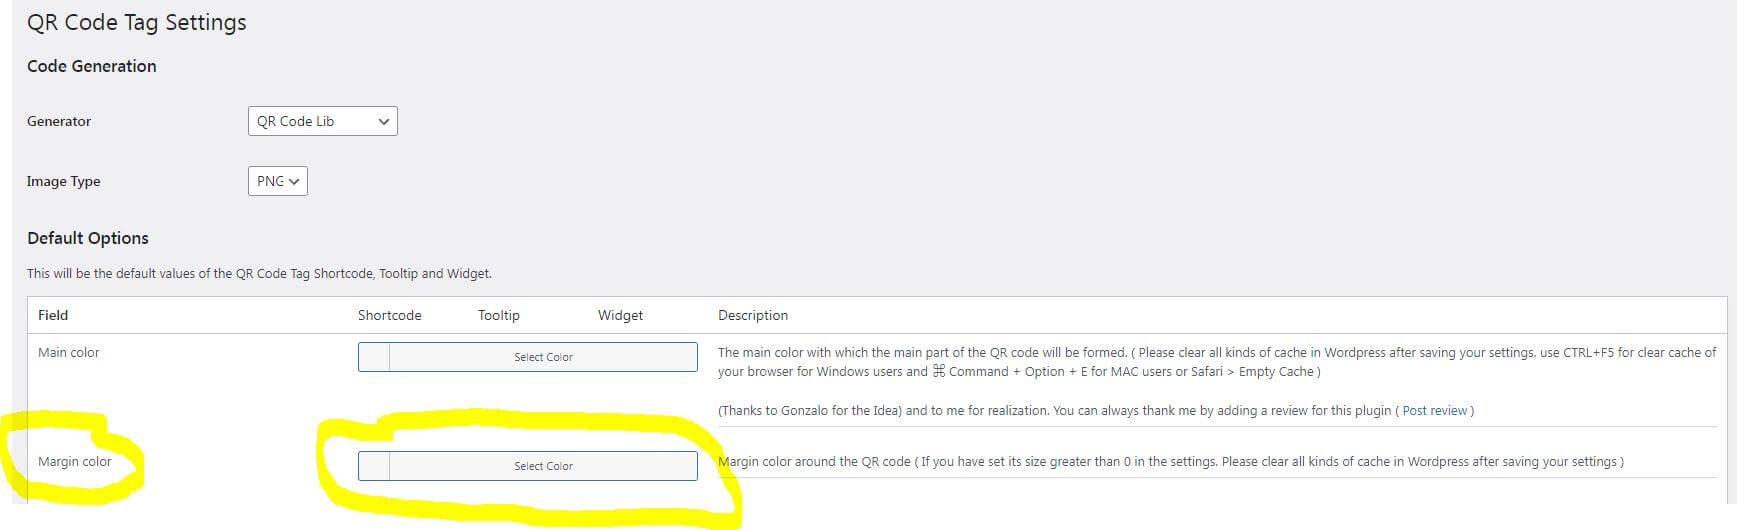
After selecting the colors for the QR code, save the settings. Please clear all kinds of cache in WordPress after saving your settings. Use CTRL+F5 to clear your browser cache for Windows users and ⌘ Command + Option + E for MAC users or Safari > Empty Cache.
Use in any WordPress content #
Using as a shortcode #
Without content #
In the posts editor type
[qrcodetag_from_goaskle_com/]
and a QR code with a link to the current URL will be rendered
With content #
To automatically generate a QR Code, insert the following shortcode while editing your content:
[qrcodetag_from_goaskle_com] Your content [/qrcodetag_from_goaskle_com]
Replace “Your content” with the data you want to encrypt in the QR Code, which will then be read. There are no restrictions, you can use any characters to enter your phone, email, link, names, addresses or any other data.
The system of QR codes has its own rules, for example you can not transfer your data on a new line without using a special code:
%0A – This code is a line break. If you want to write text on 2 or more lines, you can write it this way:
Your %0Acontent — then you get your data inside the QR Code this way:
Your
content
Here is example of shortcode with line break:
[qrcodetag_from_goaskle_com] Your %0Acontent [/qrcodetag_from_goaskle_com]
Here is example of QR Code with line break #1: 
Options of shortcode #
size #
– The size of the generated QRCode image (in pixels). it’s always a square, so you only need to set one side
Example with size option ( image size of QR Code will be 400px X 400px ):
[qrcodetag_from_goaskle_com size="400" ] Your content [/qrcodetag_from_goaskle_com]
You will see 400 X 400px image like this:

ecc #
– Error Correction Level ( L allows 7% of a QR code to be restored, M allows 15% of a QR code to be restored, Q allows 25% of a QR code to be restored, H allows 30% of a QR code to be restored )
Example with ecc option:
[qrcodetag_from_goaskle_com ecc="H" ] Your content [/qrcodetag_from_goaskle_com]
You will see QR Code image like this ( with High error correction level allows 30% of a QR code to be restored ):

margin #
– Defines the margin (or blank space) around the QR code (in QR Code pixel size – not actual pixels!). By default its 4.
Example with margin option:
[qrcodetag_from_goaskle_com margin="0" ] Your content [/qrcodetag_from_goaskle_com]
You will see QR Code image without margin:

link #
– Defines if the image of QR Code will have a link (here is possible values for this option):
url = link to the current URL
https:// = link to some URL (e.g. https://www.google.com) )
Example with link option:
[qrcodetag_from_goaskle_com link="https://goaskle.com/en/docs/wordpress-plugins-from-goaskle-com/qr-code-tag-for-woocommerce-and-wordpress-from-goaskle-com/installation/"] Your content [/qrcodetag_from_goaskle_com]
You will see QR Code image wrapped with link:

Using as a tooltip #
[qrcodetag_from_goaskle_com tooltip="The content that will be encrypted inside the QR Code"] Content visible on the page, on hovering over which the QR Code appears [/qrcodetag_from_goaskle_com]
Here is example of QR Code with Tooltip option #2:
Content visible on the page, on hovering over which the QR Code appearsUsing as a Sidebar Widget #
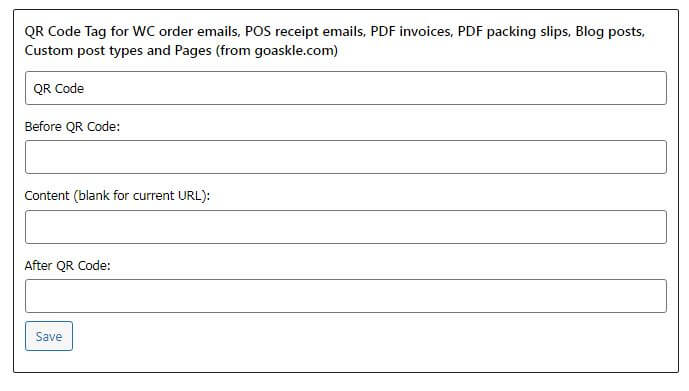
Just find the Widget (Appearance | Widgets) called: “QR Code Tag for WC order emails, POS receipt emails, PDF invoices, PDF packing slips, Blog posts, Custom post types and Pages (from goaskle.com)” and edit its properties according to your needs.
Using in PHP code #
To use the QR Code inside your template or PHP enabled posts, use the global $qrcodetag_from_goaskle_com object:
global $qrcodetag_from_goaskle_com;
echo $qrcodetag_from_goaskle_com->getQrCodeUrl($content, $size, $encoding, $ecc, $margin, $version);
In order to display a 100 x 100px QR Code in the page template you would include this PHP code:
<img src="<?php
global $qrcodetag_from_goaskle_com;
echo $qrcodetag_from_goaskle_com->getQrCodeUrl('mycontent',100,'UTF-8','L',4,0);
?>">
Use In Woocommerce #
Disable for Woocommerce (Auto) #
If you do not need QR Codes to be automatically generated for Woocommerce plugin and compatible with it:
- Go to WordPress admin -> Settings -> QR Code Tag (from Goaskle.com)
- Check the checkbox labeled “Disable for Woocommerce (Auto)” ( You will still be able to use Shortcode, Widget and Tooltip modes )
- Click Save Changes in the middle of Settings Page
Disable for ALL Woocommerce emails except these statuses: #
If you will enable this checkbox then you will disable qr code for all Woocmmerce emails except these
( In other words you need to mark only those emails in which you want to insert the QR code ) :
Enable for new orders for Woocommerce emails ( Enable QR code Generating for new orders for Woocommerce emails )
Enable for failed orders for Woocommerce emails ( Enable QR code Generating for failed orders for Woocommerce emails )
Enable for on-hold orders for Woocommerce emails ( Enable QR code Generating for on-hold orders for Woocommerce emails )
Enable for processing orders for Woocommerce emails ( Enable QR code Generating for processing orders for Woocommerce emails )
Enable for completed orders for Woocommerce emails ( Enable QR code Generating for completed orders for Woocommerce emails )
Enable for refunded orders for Woocommerce emails ( Enable QR code Generating for refunded orders for Woocommerce emails )
Enable for partially refunded orders for Woocommerce emails ( Enable QR code Generating for partially refunded orders for Woocommerce emails )
Enable for cancelled orders for Woocommerce emails ( Enable QR code Generating for cancelled orders for Woocommerce emails )
Enable for customer invoice for Woocommerce emails ( Enable QR code Generating for customer invoice for Woocommerce emails )
You can leave on only those types of emails that are necessary for you, for the other types of Woocommerce emails QR code generation will be suspended.
Access level for hash #
For use in hash feature. Use any capabilities for access level. Comma separated. It will use current_user_can function. Example: administrator,editor. No spaces. Popular roles: administrator, editor, author, contributor, subscriber. But you can use your own custom role. Also you can use any capabilities from WordPress like this: edit_posts, read ETC… This option will allow you to control who can activate and deactivate HASH code for orders. Useful if you have staff with different rights.
VAT Number #
VAT Number specified here will be displayed in the QR Code in Woocommerce
Woocommerce Data Template #
!!! CLEAR THIS FIELD FOR AUTOMATIC DATA TEMPLATE IN WOOCOMMERCE !!!
You can create any template you want by combining the variables decoded for you below in the order you want.
Woocommerce will use this template for the data to generate the QR code. The QR code will be created based on the texts and variables of this template. For example (AUTOMATIC):
Ivan Ivanov
TOTAL AMOUNT $39.10
VAT AMOUNT $5.10
VAT NUMBER 1235ABN457
DATE 03/11/2021
TIME 19:03
https://goaskle.com
You can easy use your own text, labels and these variables:
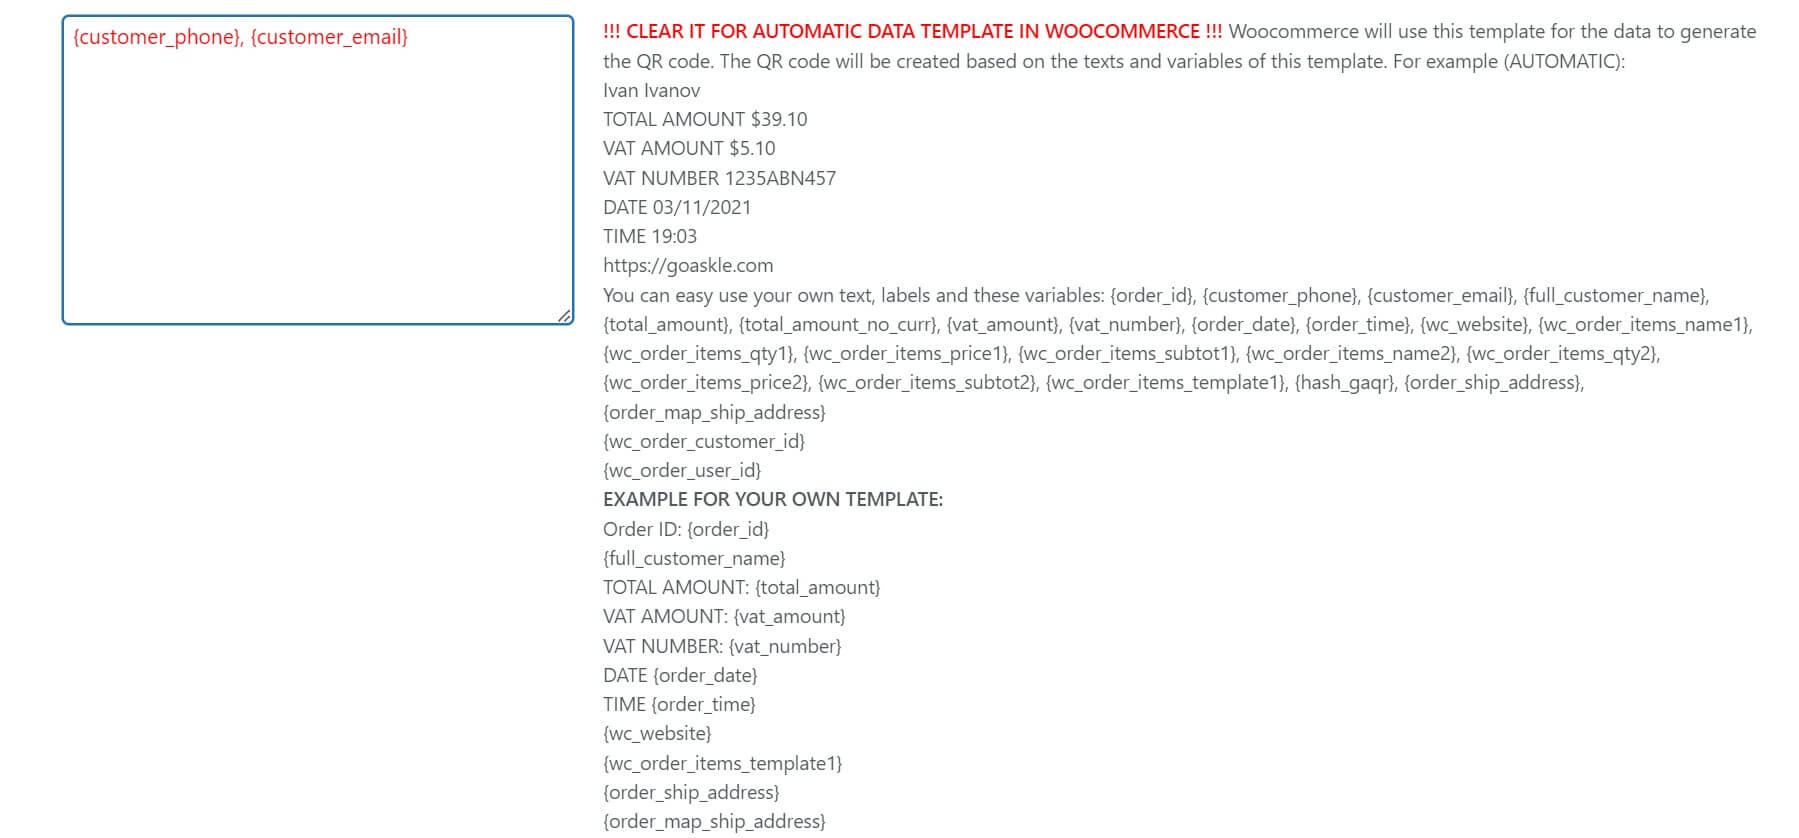
{order_id}, {full_customer_name}, {total_amount}, {total_amount_no_curr}, {vat_amount}, {vat_number}, {order_date}, {order_date_year}, {order_date_mon}, {order_date_day}, {order_time}, {wc_website}, {wc_order_items_name1}, {wc_order_items_qty1}, {wc_order_items_price1}, {wc_order_items_subtot1} , {wc_order_items_name2}, {wc_order_items_qty2}, {wc_order_items_price2}, {wc_order_items_subtot2}, {wc_order_items_template1}, {hash_gaqr}, {order_ship_address}, {order_map_ship_address}, {wc_coupons_names_plus_sums}, {wc_coupons_sums}, {wc_coupons_names}, {wc_coupons_total}
EXAMPLE FOR YOUR OWN TEMPLATE:
Order ID: {order_id}
{full_customer_name}
TOTAL AMOUNT: {total_amount}
VAT AMOUNT: {vat_amount}
VAT NUMBER: {vat_number}
DATE {order_date}
TIME {order_time}
{wc_website}
{wc_order_items_template1}
Variables for Woocommerce data #
{order_id} – Order ID ( usually its same as order number but sometime you can do it different )
{customer_phone} – Customer phone from order billing
{customer_email} – Customer email from order billing
{wc_order_number} – Order number
{full_customer_name} – First and Last name of customer
{total_amount} – Total mount of order with currency
{total_amount_no_curr} – Total mount of order without currency
{vat_amount} – Total amount of taxes
{vat_number} – Your Vat Number entered into settings page
{order_date} – Date of order
{order_date_year} – Year of order ( since v1.9.5 )
{order_date_mon} – Month of order ( since v1.9.5 )
{order_date_day} – Day of order ( since v1.9.5 )
{order_time} – Time of order
{wc_website} – Automatic – get url of your website
{wc_order_items_name1} – names of all products one by one ( Example: from {wc_order_items_name1} up to {wc_order_items_name999} unlimited
{wc_order_items_qty1} – quantities of all products one by one ( Example: from {wc_order_items_qty1} up to {wc_order_items_qty999} unlimited
{wc_order_items_price1} – prices of all products one by one ( Example: from {wc_order_items_price1} up to {wc_order_items_price999} unlimited
{wc_order_items_subtot1} – subtotals of all products one by one ( Example: from {wc_order_items_subtot1} up to {wc_order_items_subtot999} unlimited
{wc_order_items_template1} – predefined template for order items in this format:
Product name1 ( Qty X Price = Subtotal )
Product name2 ( Qty X Price = Subtotal )
etc…
{wc_prod_acf_ZZZ} – (added since 1.9.9 version ) Where ZZZ = your_acf_field_slug. For example: {wc_prod_acf_lecture_full_date} – get ACF product field from order ( if product will be found in order ), product will be checked and if acf field with slug “lecture_full_date” will be found in this product and this product will be found in this order then value will be shown. ACF is Advanced Custom Fields plugin of WordPress. So you can easy show all your ACF product fields in your data for QR code. For printing used standard php / acf function get_field(). It means all your results will be formatted according to acf field settings.
{hash_gaqr} – (added since 1.9.13 version ) Unique Hash generation feature. Recommended settings for Woocommerce template field are: {wc_website}/?hash-gaqr={hash_gaqr}. For more details check Selling tickets chapter…
{order_ship_address} – ( from v1.9.17 ) If the order has a shipping address, it will be displayed. If the order has no shipping address, the billing address will be displayed.
{order_map_ship_address} – ( from v1.9.17 ) If the order has a shipping address, then you’ll get a link to google maps with the shipping address. If the order doesn’t have a shipping address, you’ll get a link to google maps with the billing address.
{wc_coupons_names_plus_sums} – If coupons have been applied to the order, their complete list with coupon codes and discount amounts, separated by commas, will be displayed.
{wc_coupons_sums} – If coupons have been applied to the order, you will see their complete list only with discount amounts, separated by commas.
{wc_coupons_names} – If coupons have been applied to the order, their complete list will be displayed with coupon codes only, separated by commas.
{wc_coupons_total} – If coupons have been applied to the order, their total amount will be displayed.
{wc_order_customer_id} – Return Customer id from order
{wc_order_user_id} – Ruturn User id from order
Hash feature ( for Selling tickets or hiding order data from view ) ( since v1.9.13 ) #
You can use this function for any of your needs. For example, to sell tickets or to hide customer order data.
Hash feature is fully compatible with both: High-Performance Order Storage and Legacy Order storage modes
Example For selling tickets:
Steps:
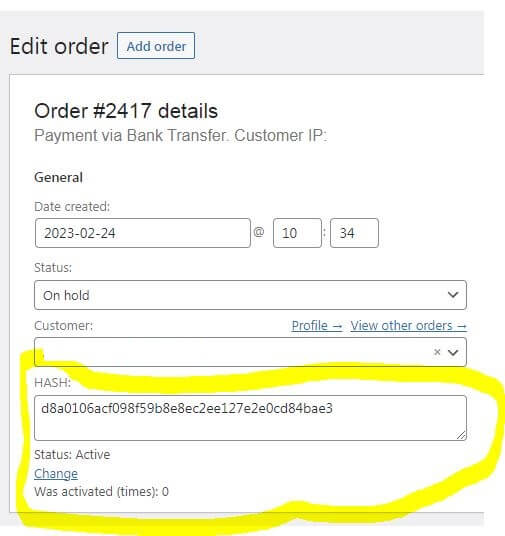
1. Enable the hash function ( in the plugin settings ).
Once activated, each new Woocommerce order will contain an automatically generated Hash. Other orders created before activation will not contain Hash (you need to edit old orders to add Hash to them).
2. Use the recommended “Woocommerce Data Template” for the QR code (copy/paste it to plugin settings).
{wc_website}/?hash-gaqr={hash_gaqr}
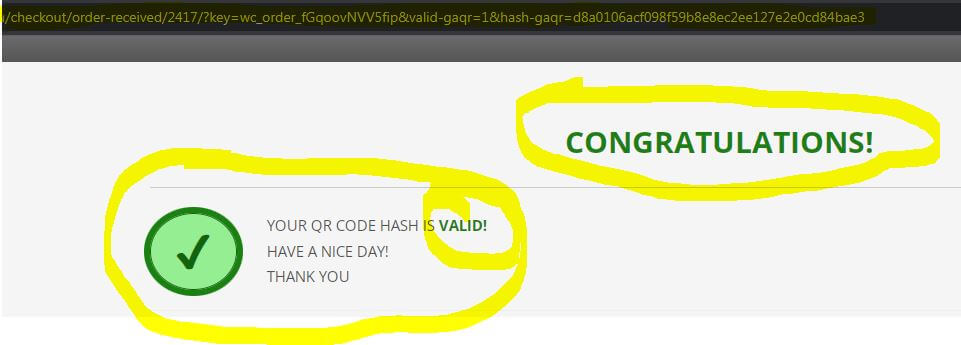
When using the recommended template, a special link will be generated that can be scanned by any QR app and by clicking on which:
Features:
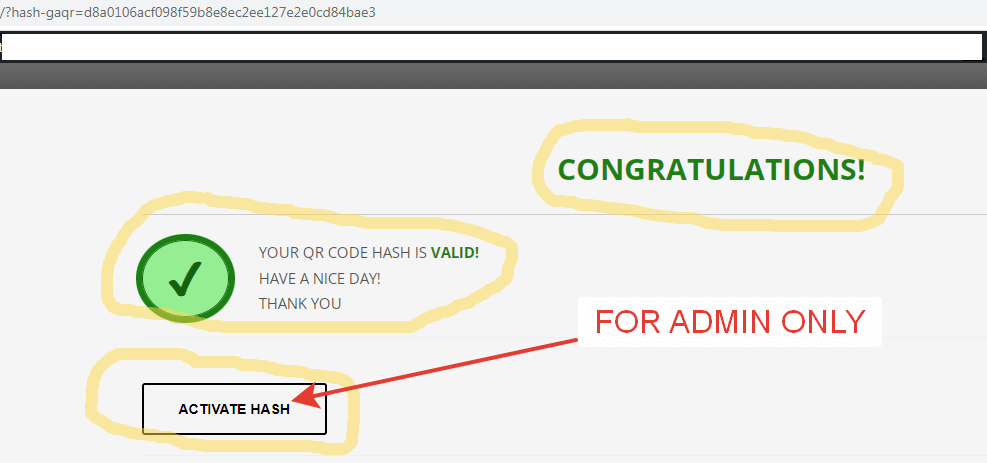
–Customers will be able to check whether their ticket is valid or already redeemed and see their order details.
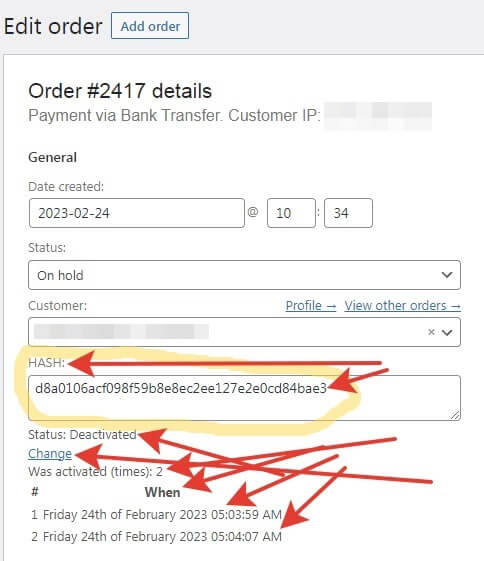
–Site administrator will be able to validate, activate and deactivate QR code using any QR app or link (in order editing mode), edit hash code, view activation list of QR code of each order (in order editing mode).
Screenshots:


Videos:
Thank you for this amazing plugin. I have just one question. How can I move the QR code in the WooCommerce emails to a different area? I would like for it to be at the top right of the emails.
Thank you.
Hello!
I will put this request into my roadmap.
Thanks for idea Oliver. I will mention you in changelog as author of this idea and will add this feature in next release. You will be able to select the position in the emails.
Hi. Thank you for this great plugin. Truly appreciate it.
I hope you can help with this issue. Below is the Data Templete I use:
Customer Name: {full_customer_name}
Order ID: #{order_id}
Order Date: {order_date}
Check Order Here:
{wc_website}/page-user-setting/?sc=booking-activity
The QR code generated works fine when scanned using an Android phone.
But when scanned in iPhone, it does not display the note for Customer Name, Order ID, Order Date, or the label Check Order Here. If you scan QR code using IPhone, it will take you directly to the website page.
Please help. Thank you.
Hello! Thanks for good question.
There is no way to help you from my side. Since this issue is related to the IOS features.
When iphone scanning qr code and will find the link then iphone will redirect to this url with no questions:
https://discussions.apple.com/thread/252588348?=undefined&previousThread=253476989021&sortBy=rank
My advice – try to find and use 3rd party APP for QR code scanning on your iphone
Hola! estoy usando el plugin pero a veces se cae el sitio, y no envia el mail. Por ejemplo si cambio estado a mas de 1 pedido a la vez el sitio se cae y vuelve, habiendo cambiado estado a solo 1 pedido. si desactivo plugin todo funciona correcto. Es un gran trabajo solucionando ese tema… tal vez sea compatibilidad?
Hola, gracias por el mensaje. Voy a tomar su solicitud en el trabajo ahora y si se confirma el error, voy a arreglarlo en las próximas versiones.
fixed in 1.9.31 version please upgrade
Hi please help me, when I create another user in wordpress, he can’t activate or deactivate the lists, it’s just not there, but when I log in as the main admin, it works. I tried to set the new user to the administrator role and it didn’t help. Please advise me. Thank you
Fixed in 1.9.3.3 – you can upgrade now
Hello, how are you? First of all, thank you very much for your plugin; it was the only one that managed to solve my QR code issues on the website. I was running out of options. However, I would like to ask for your help if possible. I followed all the steps to install the plugin and even enabled the “legacy” mode in WooCommerce, but I still get the attached error when I try to complete the checkout. I am using the latest version of WordPress and WooCommerce. Once again, thank you very much. Have a great day. Print here… Подробнее »
Please upgrade to latest version and let me know if you will have same error. I fixed some issue in 1932
please send me more details
Please upgrade to latest version and let me know if you will have same error. I fixed some issue in 1932
plugin will not appear in woocommerce settings
just setup woocommerce settings like this
Please upgrade to latest version and let me know if you will have same error. I fixed some issue in 1932
Por favor estoy tratando de instalr el pluging para wocommerce para emitir tickts para un evento junto con el email de recibo de pedido y no sale en QR seguí todas las instrucciones y no aparece. En Setting de WooCommerce no aparece nunca el plugin
Hello. Did you enabled hash feature and did you change order saving type settings in the woocommerce? Because new version of woocommerce used new way to save orders so you need to enable compatiblity mode or set order saving to legacy mode
check this
Gracias por responder, si lo hice y no funcionó
Please send me access to your wordpress admin
Use private area for passwords
https://portal.goaskle.com/
Thank you very much for a great plugin! Great Work! I do have a question if it’s ok. How can I make that on scanning the generated QR code with hash function, the link to take me directly to the “edit order view page” instead of “thank you/activation” page. Thank you
Hello! Its very easy – insert into your woocommerce data template field in plugin settings this link:
{wc_website}/wp-admin/post.php?post={order_id}&action=edit
instead of this one
{wc_website}/?hash-gaqr={hash_gaqr}
Hello, I would like to ask you for help. I have changed my order numbering by plugin because I need to start all the orders from the begin (from 0001) since the 1.1.2024. But it leads to the difference between order_id and order number. My order id is e.g. 650 and order number 202400042. Please how to get order number into the qr code? Which tag to use? Thank you for your hepl in advance. Best regards Mira, Czech Rep.
Hello. Just send me info about plugin that you used for changing the order number?
I will check it but if you asking Is it means that but of my tags – order_id and order number is not equal to your new order numeration?